TRX250r.org

Author Topic: My tank design!  (Read 4408 times)

Offline Pricecheck

My tank design!
« on: December 07, 2013, 09:32:36 PM »
Well, as many know Troy designed an aluminum tank in the past. I loved the style but wanted more capacity since I ride xc.

During many hours I've finally got a wooden dowel rod and paper template. Hopefully I can touch base with him and look at what it would take to make it perfectly symmetrical and find out the capacity.

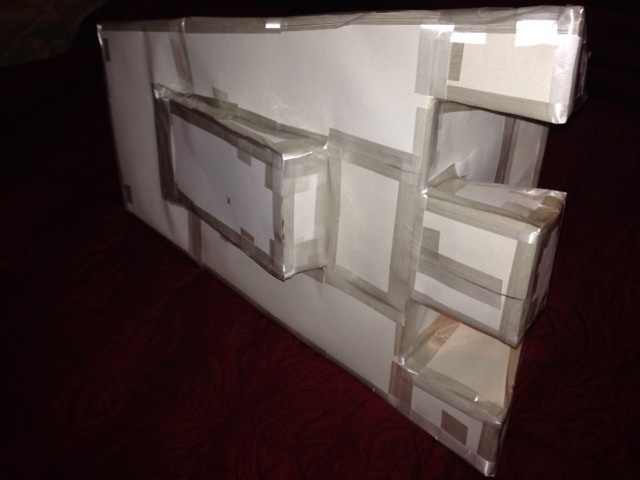
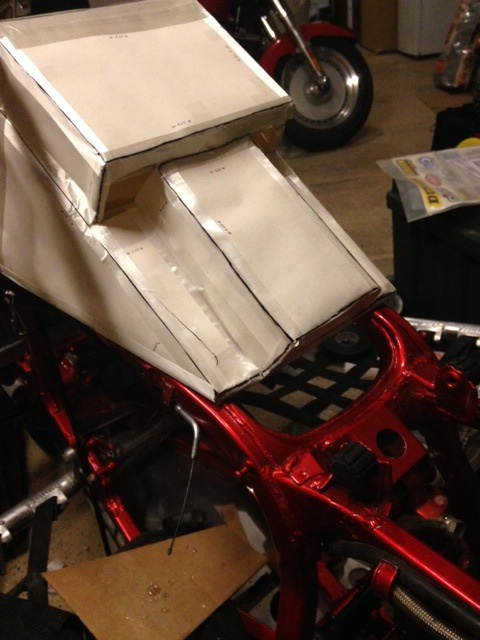
It is built for my 86 R with maier race plastics, +2 stem and precision clamps. This was all mocked up with the stock front tank mount in place as well. Beneath the tank was a little spacing to allow for tank mounts. The sump was added to help with fluid capacity and partially flow. I maximized all space up front. I used it all the way to the radiator on both sides and the middle. The radiator cap can still come off. The stem clears and there's plenty of room for the cap up top.

I really want to put this together but steel is my only welding that I do and I prefer the non rusting lightweight qualities of aluminum.

Anyways, here are some pics taken with the phone. Measurement wasn't used a lot. Just comparisons on pieces cut!

« Last Edit: January 04, 2014, 03:08:19 PM by Pricecheck »

Offline Pricecheck

My tank design!
« Reply #1 on: December 07, 2013, 11:42:06 PM »
Thanks.  Well, initially it was tape and cardboard.  Then I went with dowel rods and hot glue.  The wood and glue took about 3 hours since I have to do it with the plastics on and I'm trying to squeeze every bit of feasible space out of it.  Another 2 just to tape it all.  I had to cut each piece of tape and that took a while.

As of right now I just took approximate measurements.  Nothing exact but it gives me an idea on what I'm working with.  All measurements added up to 4.7 gallons!  On tapered in areas I just took the middle measurement and went with that.  On a triangular prism I went with appropriate calculations.  I'm actually surprised that this gave me this much volume.
« Last Edit: December 08, 2013, 02:50:40 AM by Pricecheck »

Offline Pricecheck

My tank design!
« Reply #2 on: December 07, 2013, 11:51:49 PM »
It looks like arts and crafts at the bar in my house.  Scissors, paper shreds, tape, tape measure and pens.  My wife is reminding me that I'm not having one built.  I'm curious on how to line a steel tank and also how much more they weigh than an aluminum one.  Regardless of material I'll be powder coating the outside.  If steel would work, I'd do it myself and use the brake I just purchased.  Try to make as many pieces solid as possible.

Besides all of that I'll let Troy 3D scan this thing and tweak it and make them as people need them.  He's got the CAD and the experience.  I just have boredom!

Offline Pricecheck

My tank design!
« Reply #3 on: December 07, 2013, 11:59:18 PM »
The whole tank without the part that sticks out is 3.71 gallons.  The front pieces only give about a .10 gallons.  The sump gives .15 gallons.

The main thing I did to improve was the width under the plastic, the portion up front, the sump, the larger and wider hump under the seat, the distance it comes back under the seat and blocking off the tank on the portion above the plastic.

I'f I'm correct the stock tank is 2.6 gallons with a .5 gallon reserve.  Pretty large improvement without the "zit" look from the oversized manufactured tanks.  This style goes with the flow of the plastic.  In addition it gives you that better LCOG (low center of gravity).

I can't wait to get this thing solidified.
« Last Edit: December 08, 2013, 02:53:01 AM by Pricecheck »

Offline jamieg45

My tank design!
« Reply #4 on: December 08, 2013, 07:53:05 AM »
Nice job man, can't wait to see it in metal. Aluminum or steel, good luck with it.
01 Lsr 250r
00 Walsh 250r

Offline jcs003

My tank design!
« Reply #5 on: December 08, 2013, 07:58:18 AM »
get it drawn up in some CAM software so you can get the pieces cut.  looks like more than 3.7 gallons.   very deceiving pics.

john

Offline Pricecheck

My tank design!
« Reply #6 on: December 08, 2013, 01:26:51 PM »
Quote from: jcs003;19374
get it drawn up in some CAM software so you can get the pieces cut.  looks like more than 3.7 gallons.   very deceiving pics.

john

Just the part below the plastic is 3.7.  When you add that it'll be an additional gallon.  This will be a long project since it isn't needed and I'm not sure how much it'll cost just yet.  Since it isn't needed that's why it isn't a priority.  Just something fun to tinker with and to have that's custom.

It will be a lot of welding but not much.  I design and build utility trailers on the side and I enjoy the welding.  It's nice to have a "one off" part and I think that's what drives me.  I'll definitely keep y'all updated on any progress.

Offline Pricecheck

My tank design!
« Reply #7 on: December 08, 2013, 10:13:39 PM »
Here's some with the template on the R.  The center piece up front has its angle a little too steep.  I tried keeping those angles up front with the steering stem hoop angle.  The top was kept with the plastic bends.  Under the seat is super tight.  Depending on the final design, I might need to take about 1/8" off of the height under the seat.  There are pads under the seat pan but I'm not sure I like it being so close.

[ATTACH=CONFIG]2605[/ATTACH][ATTACH=CONFIG]2606[/ATTACH][ATTACH=CONFIG]2607[/ATTACH][ATTACH=CONFIG]2608[/ATTACH][ATTACH=CONFIG]2609[/ATTACH]

Offline Dezsled

My tank design!
« Reply #8 on: December 09, 2013, 03:47:49 PM »
Throttle & clutch cable routing needs consideration, just sayin

Use of bends rather than welding would be best, welding on tanks that have had fuel in them 5 minutes ago is scary but can be done


\'04 Roll LOBO II TRX250R
\'06 LTR450
\'87 HPR LT500
\'87 LT500
\'85 & \'86 LT250
\'86 & \'87 TRX250R
\'07 & \'09 Husqvarna TE450
\'00 CR125R
Parts & more parts

Offline Pricecheck

My tank design!
« Reply #9 on: December 09, 2013, 03:54:25 PM »
It won't have had fuel in it. I also have a brake that I'm going to try and utilize as much as I can to reduce junctions.

Throttle and clutch cables are considered and cause no issues. That's what actually caused me to not go further in the center piece up front and wider on the sump.

Offline Pricecheck

My tank design!
« Reply #10 on: December 27, 2013, 09:29:00 PM »
Today I figured I'd go out and grab some steel for the tank build.  This piece is the bottom and it is 16 gauge.  The sump will also be 16 gauge steel.  The rest of the tank will be 18 gauge.  I am aware of all rust issues and this thing will be coated inside and out after pressure testing.  It looks so much wider than the template but all measurements are exact and symmetrical.  This won't be the fastest build but it will get done.  Kind of waiting on my engine to return to check clearance on my coil and head.

Offline Dezsled

My tank design!
« Reply #11 on: December 28, 2013, 12:25:54 PM »
Here's the bottom of a trx250r 6 gallon tank, sorry it's not the best but it does clear the spark plug cap and scalloped for the head stay


\'04 Roll LOBO II TRX250R
\'06 LTR450
\'87 HPR LT500
\'87 LT500
\'85 & \'86 LT250
\'86 & \'87 TRX250R
\'07 & \'09 Husqvarna TE450
\'00 CR125R
Parts & more parts

Offline Pricecheck

My tank design!
« Reply #12 on: December 28, 2013, 01:08:01 PM »
That's nice looking. I wish I could weld aluminum.

My biggest concern now is that I'm using an esr mount to hold my coil underneath the tank and I want to know where to start the sump.

The scalloped style is nice and sleek. I'll have to remember that.

Offline Pricecheck

My tank design!
« Reply #13 on: December 31, 2013, 12:30:22 PM »
Here's some progress. The part near the bars clears but I'm going to take the center rise out and make it all notched out for a cleaner look.  Uploaded from my phone but don't feel like rotating them.

I found out that some of my template measurements were based off of plastic clearance. Plastic is tweaked a little so I had to design as I went along. Just a cut off wheel, welder, horror freight 18" brake and some delicious left hand brewing nitro milk stout!

Also, the part coming up above the plastic is 2.5". I didn't calculate correctly and was too focused on the angle showing above the plastic and didn't realize what a difference that would make when it went to the next angle. That caused the horizontal piece above the plastic to be 3" tall. A little higher than I wanted but with the notching it will give me more capacity.


And the mess I need to straighten up. Luckily it's a 3 car garage.

Offline Pricecheck

My tank design!
« Reply #14 on: January 04, 2014, 03:11:44 PM »
Thanks man.  I've got them back up.  

No progress has been done in the last couple of days besides completely welding what has been attached and mostly smoothing it out.  I have one very small pin hole leak so far.  I have also drilled the holes for the bottom mounts.  I'll throw in some pics and plans once I've got that going again.

So far I've been preoccupied on buying another toy.  Thinking about a powered paraglide/paramotor (PPG) or powered parachute (PPC).  They look like good fun and I think it would be a thrill to view everything from a different angle.


Sitemap 1 2 3 4 5 6 7 8 9 10 11 12 13 14 15 16 17 18 19 20 21 22 23 24 25 26 27 28 29 30 31 32 33 34 35 36 37 38